
Throughout the series of our Royal Q posts, we discussed in depth what RoyalQ is and how to make tons of money with it.
In this post, I want to show you how to secure your account from a potential hack.
Yes! You heard me right.
RoyalQ has proven to be one of the most profitable cryptocurrency apps.
But just as in every case, the bad guys are always lurking around the corner preparing to launch their attack.
There has been a reported case of a compromised account, which is why I am bringing this notice to you.
By the time you’ve finished reading this article, you’ll know how to secure your account so that it can never be hacked.
Post Summary
This is what I will cover:
Note:
We created a special series just for the RoyalQ bot.
This is to give you the best understanding of how the bot works.
Check out the previous series here:
- Let A Bot Trade For You (I): Introducing RoyalQ Bot
- Let A Bot Trade For You (II): Activating and Binding RoyalQ Bot
- Let A Bot Trade For You (III): Trading With RoyalQ Bot
- Let A Bot Trade For You (IV): Making Money From RoyalQ Bot
- Let A Bot Trade For You (V): How To Withdraw And Transfer From RoyalQ
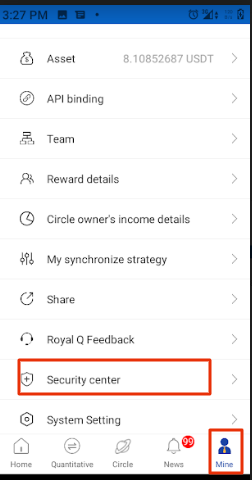
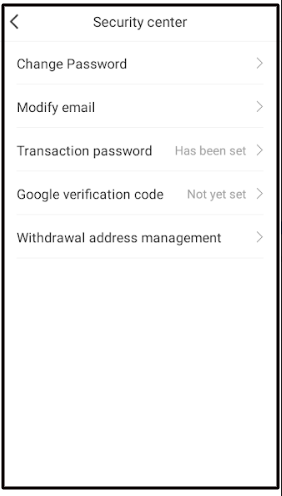
1. How To Secure Your RoyalQ Account – RoyalQ Security Center
Because RoyalQ is concerned about user funds’ protection, it made available the “Security Center.”
This offers a list of security features that guard your account against security vulnerabilities.
Take a quick peek below.
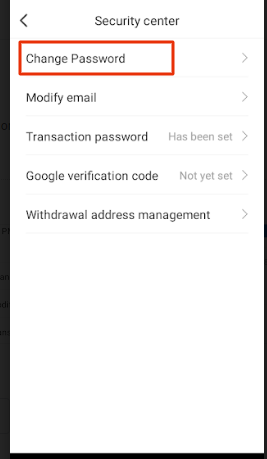
- Change Password
- Modify Email
- Transaction Password
- Google Verification Code
- Withdrawal Address Management
We’ll go through them one by one.
1. Change Password
If you shared your RoyalQ password with someone or logged in using someone else’s phone, please, reset your password as soon as possible.
Here’s how to change your RoyalQ password step by step.
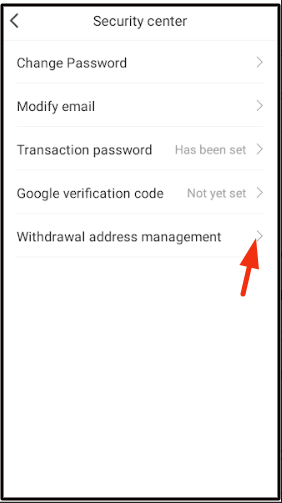
- Open your RoyalQ App and click “Mine”. Then, scroll down and click “Security Center”
- Click “Change Password.” Enter your old password and your new password and click “Done.”
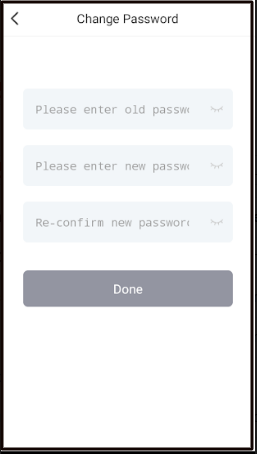
You have successfully changed your password!
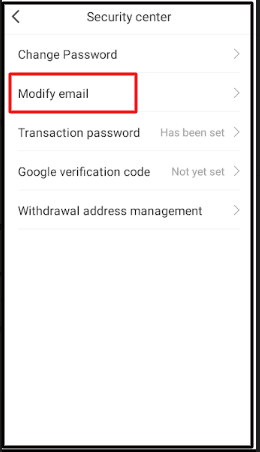
2. Modify Email
RoyalQ provides this feature to allow you to change the email address that you used to register your account.
While this offers you some account flexibility and security, it does, however, pose the threat of a security breach.
This is because someone that has access to your RoyalQ and email account might tamper with it.
Yes! They can do this by modifying your email to theirs, such that the account becomes theirs.
Again, if you suspect that someone is snooping through your email account, change your email right away.
Below is how to change your email account!
- Once you are on the “Security Center”, click “Modify email”. Fill the form that displays on your screen and click “Confirm”. Your email will be successfully reset.

3. Transaction Password
This security feature is compulsory for every withdrawal on RoyalQ.
It is a six-digit code that authorizes every withdrawal you make from your account.
You can change this code anytime you want, but make sure to keep the current code secure.
4. Google Verification Code
The more advanced method of adequately securing your RoyalQ account is to use the Google verification code via the Google Authenticator App.
It allows you to add an extra layer of security to your password.
This ensures that even if someone knows your password, they won’t be able to use your RoyalQ app unless they also have your phone.
Follow these steps to bind your RoyalQ to the Google Authenticator:
- On the “Security Center”, click “Google Verification code.”
- You will get a step-by-step instruction of how to start up the process.
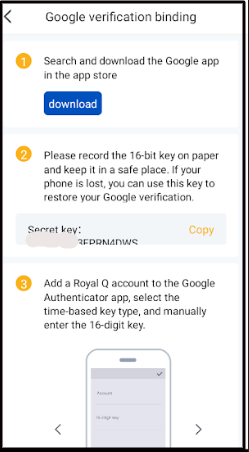
We will take each of these steps one after the other.
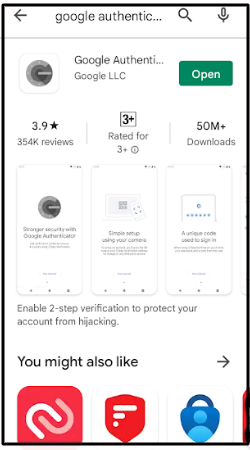
Step 1: Go to the Play Store or App Store and download the Google Authenticator App. Once installed, click “Open”
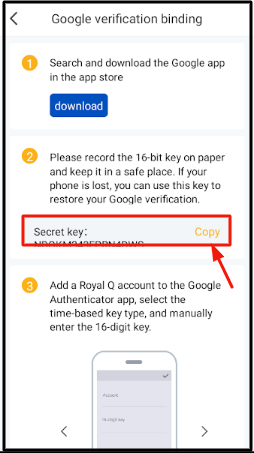
Copy your “Secret Key” and store it securely.
It is a backup code that will help you restore your Google verification if anything happens to your phone.
Step 2: Go back to RoyaQ and copy the ‘Secret key’.
Step 3: Go to the Google Authenticator App and follow the steps below to bind your account.
- Click the “Add” icon on your phone
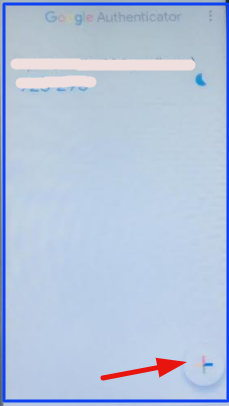
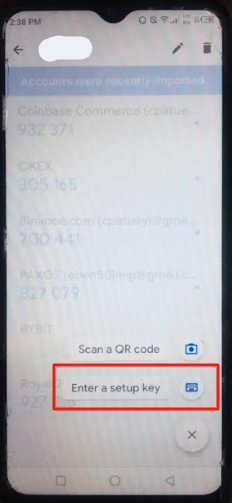
- You will receive 2 security options, select “Enter a setup key”
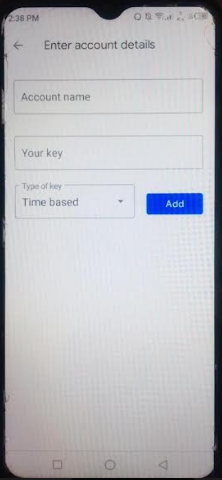
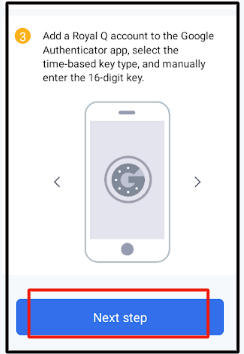
- “Enter account details”; give your account a name, say, RoyalQ, paste your “Secret key”, select “Time based” as your type of key and click “Add”
- After that, you will receive a Google verification code.
- Go back to RoyalQ and click “Next Step”
- Enter your “Email verification code”, then your “Google verification code” and click “Confirm”.
Note that each “Google verification code” is only valid for a few seconds.
Preferably, get your “email verification code” first before pasting the “Google verification code.”

That’s it on Google verification code!
So for each time you want to log into your account, you will be required to provide the Google Authentication code.
This will serve as extra security for your account.
5. Withdrawal Address Management
This is another excellent security feature that allows you to whitelist a wallet address.
After you’ve done this, any funds moved from your RoyalQ account will only be withdrawn to that address.
Follow the steps below to enable this security feature:
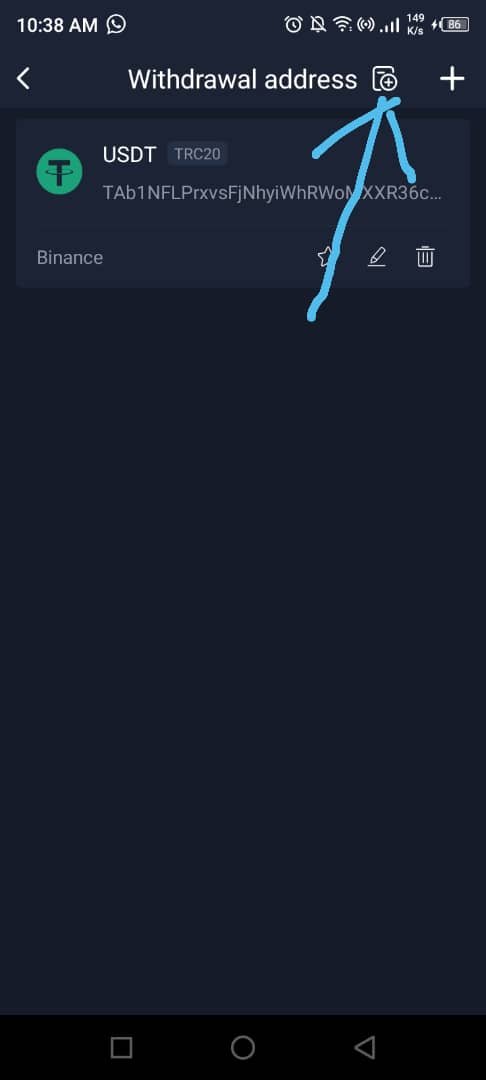
- On the “Security Center”, click “Withdrawal address management”.
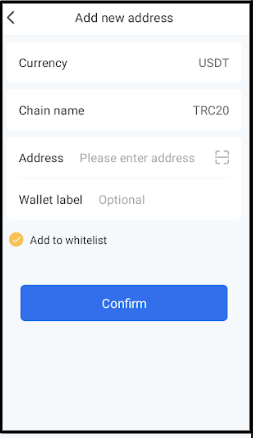
- Click the “Add” icon

- Enter the wallet address you want to whitelist and click “Confirm”
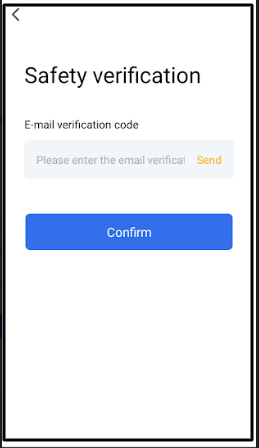
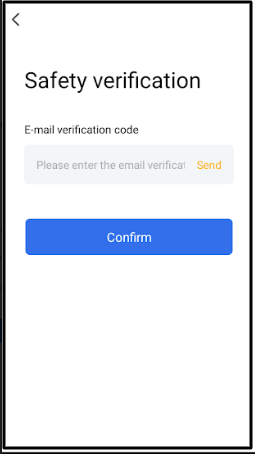
- Click “Send” and enter the verification code that was sent to your email, then click “Confirm”
- Your wallet address will be added to RoyalQ. Click on the “Add Icon” just after “Withdrawal address”
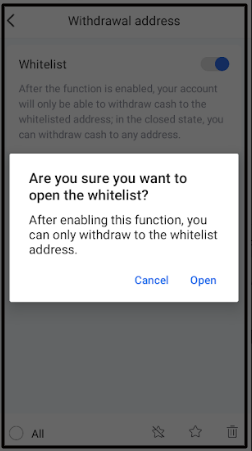
- Enable “Whitelist” by clicking the button besides it. When you do that, a notification will pop up, click “Open”
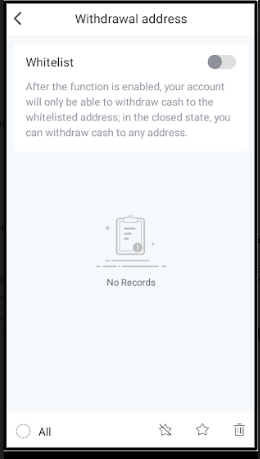
- Click “Send” and enter the verification code that was sent to your email, then click “Confirm”
We have covered all the security features on RoyalQ. It is now time to call it a wrap.
But before that let’s see the FAQ section!
2. FAQs
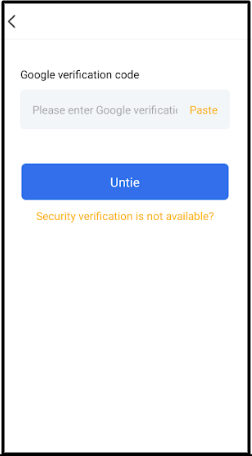
Yes, you can do this by clicking the “Google verification code” option. After that, click “Untie” and then “Confirm.”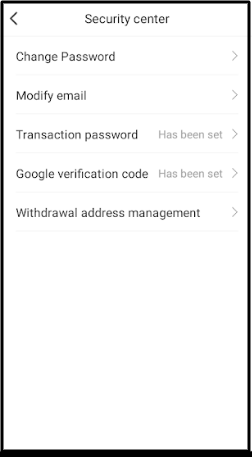
Whitelisting something means that you approve of it.
Just like we whitelist certain email addresses to confirm that we should receive messages from them, so it is in this case.
When you whitelist a withdrawal address on RoyalQ, you are indirectly telling RoyalQ that the wallet address has been approved by you.
So it means that you can ONLY withdraw your funds to that particular address.
No, you can add as many wallet addresses as you want to whitelist.
The only criterion is that it has to be a USDT TRC20 address.
Yes, please.
To do that, follow these steps:
#1: Open your RoyalQ app → Mine → Security centre → Withdrawal address management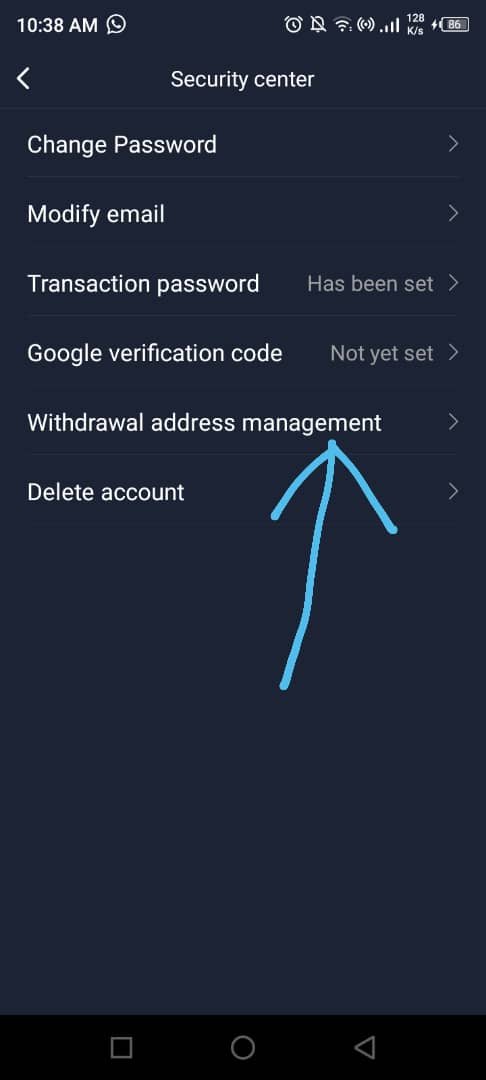
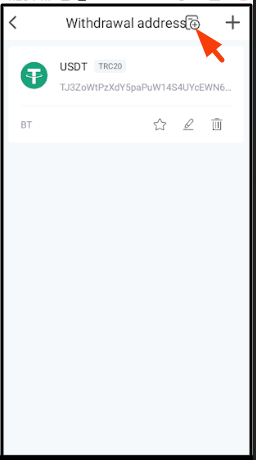
#2: Click the icon beside ‘Withdrawal address’ as indicated in the image below.
#3: Turn off the ‘Whitelist’ button. This now enables you to use any address of your choice.
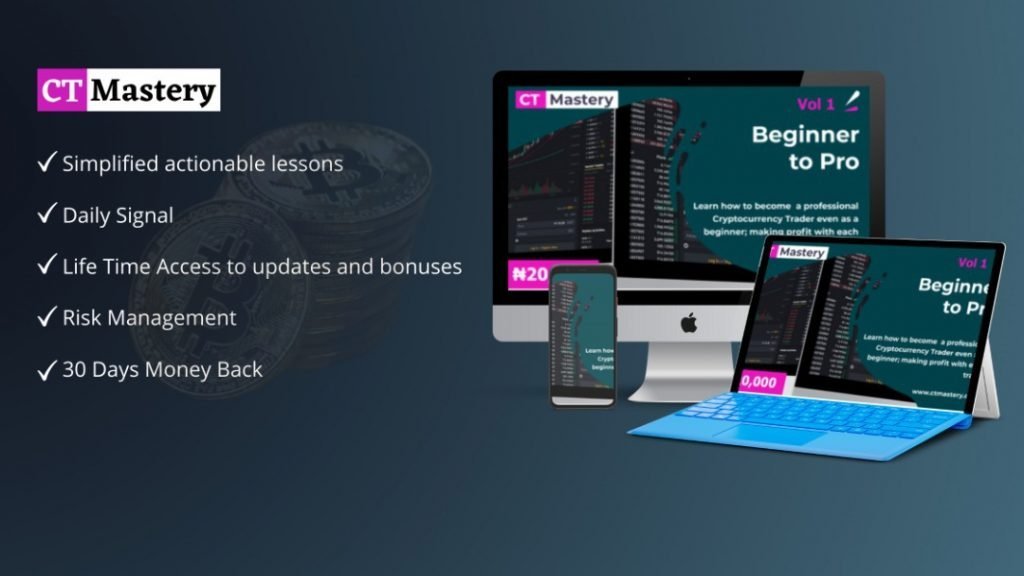
Ps: If you want to learn how to trade cryptocurrencies profitably, we developed a perfect course to help you master Cryptocurrency Trading.
Go to www.ctmastery.com to enrol.
You can also join our Telegram community at https://t.me/ctmastery for more information.
Conclusion
This is where the drapes for this post will be drawn. I hope you found it informative?
While making money with RoyalQ is essential, keeping your account safe is even more important.
All the steps I outlined in this post are RoyalQ security measures.
If you complete them, your account will be protected from a potential hack.
Now, it is over to you:
Did you learn about RoyalQ security measures by reading this post?
Do you have any questions to ask about the RoyalQ security centre?
Put them in the comment section and I will respond.
Make sure you do not go without sharing this post with your friends; click the share buttons. Cheers!

")

0 Comments